
With VFX having so many departments that depend on each other, understanding the relationships between them can be difficult. In this week’s article, we are uncovering the stages of production that make up the pipeline as well as the departments within them.
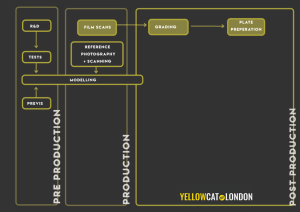
The best way to think of your average VFX pipeline is imaging it as a graph. On this graph, we want you to picture left side representing the start of the project, and the right the end:

As you can see the pipeline is broken into three, Pre-Production, Production and Post-production.
Research & Development
Generally, the first stage of the VFX pipeline starts when the concept artist has developed his idea to pass onto research and development – a team made up of programmers, scientists and mathematicians. Why? It’s their job to code/source the tools/plugins needed to make the production possible. Often you will find them integrating their expertise to customising technology specific to projects they are on.
Interesting stuff – makes you think about the level of detail that goes into production!
Tests
Part of a studio winning work is demonstrating a potential look/feel/style/technology that will be used in the production. This stage of pre-production tests is done as a proof of concept for the client giving them an insight into the studio’s vision and capabilities.
Once this stage is done, modelling can begin.
Modelling / Pre-visualisation
Modelling tends to begin in Pre-production so that low-res models can be created for pre-visualisation (pre-vis) – where you turn the story board into basic 3D animation as a guideline for directors. Several versions will be made before a final option is chosen by the client, often differing from the original pre-vis guidelines.
The modelling phase goes on through production into the start of post-production where models will be always being created tweaked and finalised in different resolutions until the client is happy.
Modellers can be subdivided into teams that focus on environment, creatures, vehicles, props etc.
Reference photography + scanning
By now the production stage would have started, meaning that the filming is under way. High dynamic range reference photography will be taken on set by a 3D/VFX supervisor that is used as a bench mark for textures, models, lighting and potentially even matte painting.
Then laser-based 3D scanning technology is used to create models of the environment/buildings/props. The idea is to capture as much visual information about the set as possible so it can be reconstructed in CG if needed.
In this stage, the Supervisor would be working between the studio and the set collaborating with the crew to give an insight of CG capabilities.
Film scanning / Grading / Plate Preparation
Once filming is complete, each shot is converted to high-dynamic quality then passed onto grading – the team that make changes to the colour and exposure according to the brief.
With most movies still shot on film, dust and chemicals can stain the shots, so here a team of compositors will clean up any scratches/patches that appear in the scans.
Rigging
For the next stage, the rigged models need to be ready to pass over to the animators. The rigging process is essentially putting the bones in the mesh of your 3D model. A riggers job is to create a realistic structure with joints that coheres with the way that object should move or react within specific environments.
It is then a back and forth with the animators who will try to ‘break’ the rig for a new revised one to be created. This may well continue throughout the entire animation cycle.
Match moving
Next is Match-moving; a technique that allows you to insert computer graphics into live-action footage with the correct position, scale, orientation, and motion relative to the objects in the shot.
Animation / FX Animation
Once the previous step is complete, it is time to animate – brining rigged elements to life. Similar to modelling this can also in the form of characters, creatures, vehicles, props.
Animators tend to work with medium resolution versions of the models to keep their software’s running efficiently.
Next step is amending any kind of animations that require simulation. This step is usually broken into three subcategories: particles, fluids, flame and rigid body dynamics.
Texturing / Look development

Once the client is happy with a CG object, the texturing stage can begin. Here texture maps for both colour and detail are added to each model.
Then they’re passed onto a look development team to be combined with Shaders; the information affect how elements of each model looks, acts or reacts in a particular environment.
For example; water on steel, plastic in fire, rusting metal on Mars…
Lighting and rendering
Now that the texture setting is right, lighting artists will begin to render the finished CG. Using shader settings and lighting maps they use their knowledge on lighting to finalise/enhance each shot. A lighting artist will have basic compositing knowledge as they piece together their part of the scene to ensure it looks like it’s in a filmed environment.
Once this is done the scene will be passed onto a compositor to be finalised using their expertise.
Rotoscoping
Nest stage is Rotoscoping – the job of the Roto Artist. It’s the process of drawing ‘mattes’ or traced outlines around characters frame by frame so that you know where CG elements need to be placed. For example, if you were placing a CG mars backdrop against live action footage shot; the traced outlines are used to make sure that the characters are not filled by the backdrop.
Element shots
Now is the time to add the element shots. Sometimes in the production stage producers want shots included whereby they are real life versions specific textures/materials (smoke, dust, splashes etc.) against a green screen to be used for CG purposes. Mainly they are just used to give a more realistic effect.
Compositing
Compositing is the last process and it’s where all the CG elements and the scanned plates are brought together to create a seamless finished image of the production. Once it’s been approved, it is supplied back to the client who then uses the finished composited frames for creative grading and eventually to be shot out onto film or DCP for release in cinemas.
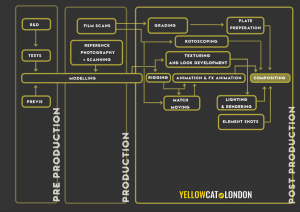
It’s obvious from the final diagram above the whole VFX pipeline is very complex with many departments working hand in hand. Whilst there will be differences from organisation to organisation, the above represents a good general idea to the basics of VFX Pipeline.
What does your VFX pipeline look like? Let us know – we would love to hear your thoughts. Start the conversation by reaching out to us – info@yellowcat.london